Weller 1010#
Note
The Weller 1010 and some other equipment is included in the catch-all Electronics Bench equipment access control.

Overview#
The Weller 1010 soldering iron is intended for connecting electrical components to each other and printed circuit boards (PCBs) by melting solder, an intermediate metal, between the metal contacts of multiple components.
While soldering as a technique can be used for other applications (like jewelry or structural assembly), the soldering irons in the SHED makerspace are intended solely for electronics work.
Prerequisites for Use#

Safety Warnings#
- Only solder under an active and running fume extractor.
- Do not touch an on or recently powered-off soldering iron, you may burn yoursel
- Molten metal is a splash and burn hazard, cover bare skin and wear safety glasses.
- Leaded solder, components, or PCBs
- Activated rosin, acid core, or other corrosive agent solders
- REACH-compliant electrical components
- REACH lead-free PCBs and solder
Usage Information#
Fume Extractor#
Before you solder, the most important thing to do is to turn on fume extraction. In the SHED, we have overhead fume extractors at each station.
To turn these on, flip the “Extractor” switch on the wall. You can then pull the extractor head down over your workspace. If you put your hand up into the extractor hood, you should feel air flowing up into it.
There is a baffle on the extractor that looks like a handle. Do not use this as a handle! Pulling it down will temporarily turn off the fume extractor, even if the switch is in the right position. Always ensure the baffle is in the right spot before you start soldering.

Changing Tips#
There are a few different tips used for different soldering applications. Tips are also consumable, and need to be replaced occasionally when they begin to oxidize and no longer retain solder.
In the image to the left, note the dull grey color of the iron tip, and that solder is not sticking to it.
Generally, you want a thicker, larger tip for faster soldering of large components and wiring, and a smaller, thinner tip is only used when soldering hard-to-reach components or very small components.
Warning
Before changing the tip, let the iron cool to 50C or below. The iron should then be switched off before continuing.

- Identify the new tip you want to use.
- Unscrew the tip sleeve using the black plastic knurling immediately below the handle of the iron.
- Remove the tip sleeve fully from the iron and put aside.
- Grab and remove the old tip from the soldering iron, pulling it straight out of the iron.
- Insert new tip into front of soldering iron until shoulder seated fully
- Re-attach and tighten tip sleeve.
- Tin and clean tip before using.
In this image left to right are the solder iron, the tip sleeve, and the tip.

Tinning the Iron Tip#
Every time you turn on the soldering iron or are about to turn it off, the tip should be tinned. “Tinning” is the process of applying solder to the tip, to form a protective barrier.
To tin the tip, bring the iron up to temperature (if it is not already) and melt solder onto the tip until the entire end of the iron is coated in solder, as seen in the image. The solder should be shiny and free of debris. If there is debris or discoloration, clean and try again.
If solder is not sticking well to the tip, it may be time to replace it. See Changing Tips above.
Cleaning the Iron Tip#
After tinning but before use, or any time debris or excess solder builds up on the iron tip, it should be thoroughly cleaned. To do this, bring the iron up to temperature (if it is not already), put the iron into the brass wool at each station, and twist. The brass wool will knock off debris and excess solder, leaving the tip clean. The tip may need to be re-tinned after cleaning.

Setting the Iron Temperature#
The irons in the SHED are set at a proper temperature for the solder we stock, and most components. For soldering very large objects, such as heatsinks or wires, you may need to increase the temperature.
To change the temperature, turn on the iron with the switch on the front left. Hitting the Up and Down buttons on the right side will adjust the temperature up and down. Temperature is displayed in Celsius.
The iron will maintain the temperature it was last set to, so always make sure your iron is at a reasonable temperature before you start soldering.
Learn More#
Click on one of the following to expand it and view contents
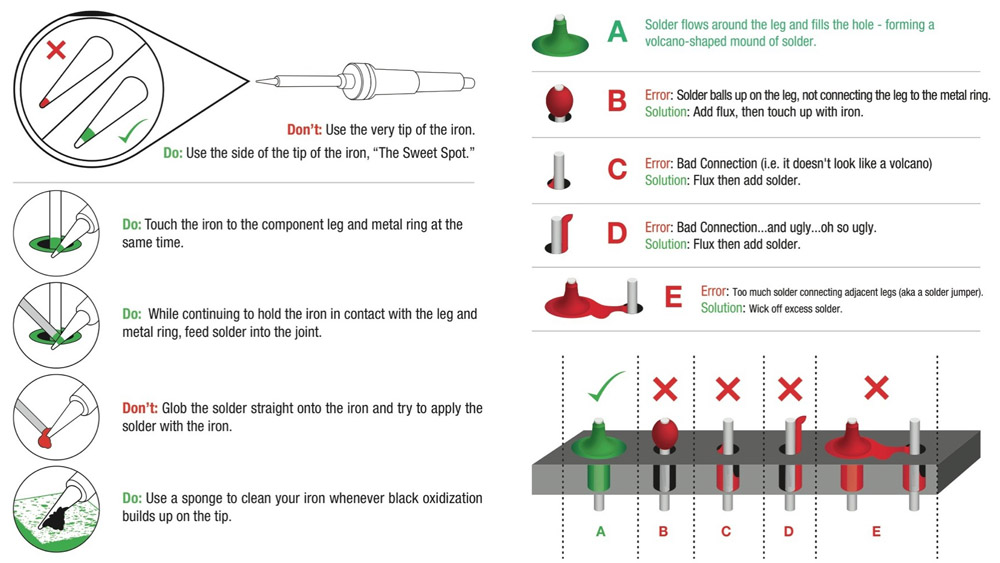
Sparkfun Solder Joint Reference Poster
Sparkfun Learn to Solder Video
HackMakeMod Soldering for Beginners
In-Person Competency Check#
To demonstrate competency with the soldering iron, you will be given the parts to construct a RITchie Tiger Soldering Badge! Reference the instructions below. Once you complete your soldering, show a member of staff that it works to get your approval. The badge is yours to keep once complete!
Required to Demonstrate: * Solder joints are fully formed and electrically sound * Maker did not burn themselves, the table, or their parts/board
