Tips and Tricks#
Want to level up your laser cutting? Here are some tips and tricks!
General#
Centering Point Mode#
By default, we use the camera for aligning a cut/engrave on the material, but there is another option better for more precise alignment; Centering Point Mode.
To enable Centering Point Mode, in the Epilog Dashboard hit "Advanced" at the top, then select a "Centering Point" ("None" is the default, and is used to turn off Centering Point Mode).
Once a Centering Point is selected, the camera view is disabled, and you will see a red mark on your design in the chosen Centering Point location. This is now the datum of your design, which will be used for alignment. Choose one that is easy/obvious to find in your material.
Now, on the laser cutter, you can use the Jog menu to go to a set location, then hit the "Center Point" button on the right (or type in exact X/Y coordinates) to set the corresponding point on your material. Now when the cut begins, the laser will perfectly align the Centering Point in your file to the programmed Center Point!
Engraving#
Precision Sync#
Turning on "Precision Sync" in the engrave process options will result in a slightly longer engrave time, but it makes a more consistent engrave depth.
This fixes the issue with small details engraving differently than the rest of the design (a good example is the tail of a "y" hanging below the rest of the text looking darker).
How it works: When you raster, the machine drives left and right. If part of your design is wide, then another part is thinner, it adjusts how far left and right it goes to only cover the actual engraving. As a result, it is accelerating and moving slower in these smaller areas than the larger areas, where it has time to ramp up. Precision sync forces all engrave passes to be at the same width as the widest point, evening out these areas.
Engraving Soot#
After engraving wood, there will be sap and wood soot deposited on the top surface of the material. These can be cleaned off in a few ways to make the design look better;
- A wet paper towel and vigorous scrubbing.
- Sanding with sandpaper, but don't go too deep or it will start to impact the engraving.
- Put painter's tape on the material before engraving, then peel it off afterwards.
When engraving acrylic, the soot is actually what gives the engraving a high-contrast look, and is responsible for the powdery white finish inside of engravings. You generally do not want to clean soot off of an acrylic engraving! If you want to remove surface soot not in the engraving, use a wet paper towel gently on only the top surface.
Paint-Contrast Engravings#
To make your engravings pop more, you can use paint! There are 2 ways to do this:
With acrylic paint, you can cover your material and engrave it after it has fully dried. The engraving will remove the paint from those areas, revealing a more natural material engrave color underneath.
Alternatively, you can engrave your material like normal (preferably with a deep engraving), and then apply paint. Let the paint fully dry, then sand off the top surfcace. The drum sander in the Atrium Makerspace can help make this a quick and easy process. Now you have paint perfecly applied to only the engraved areas!
Laser Etching Compounds#
While normally only a fiber laser can mark metal, you can use special laser etching compounds to allow CO2 lasers to leave a mark on metals! These etching compounds also tend to result in a high contrast striking finish. We actually prefer this over fiber engraving!
We have used CerMark in the SHED in the past, and it works very well.
Check out this video for a great demonstration of the material in action!
Dithering Options#
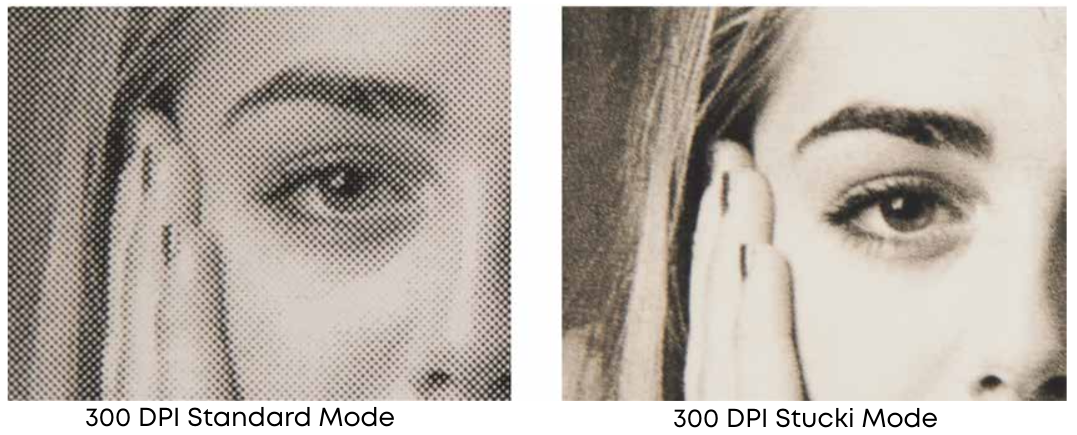
Dithering is the process by which RGB colors in an image are converted into intensity values for the laser to engrave. The Epilog software supports a number of dithering options, each optimized for different applications.
For more information on the dithering options available, see SECTION 8: SYSTEM FEATURES, Image Dithering (Page 114 or 120 depending on version) in the Epilog Fusion Edge User's Manual
Cutting#
Backflash#
When cutting, you normally get "backflash" on the back of the part, where the laser reflects off the table. This results in burnt or darkened areas of the material. To eliminate this, have your material up off the surface of the laser's bed (such as by stacking wood on either side and bridging over with your material). Now, the backflash does not hit your part!